# React 源码解析(一)JSX 转换
React 源码系列的第一章,这一章从 jsx 代码转换开始,分析一下 react 的源码部分。
React 将源码划分成了很多个单独的包,我们主要分析这几个:
- react
- react-dom
- react-reconciler
- scheduler
关于 react 版本
此系列文章中,react 版本为 16.9.0,react-dom 版本为 16.9.0。
本篇文章提纲。
- JSX 文件转换
- React.Children 原理
# JSX 文件转换
我们在写 react 项目时,都会写 jsx 组件,jsx 组件经过编译后,会转成相应的 js 文件。
我们一起进入到 babel 的官方,看一下我们平时写的 jsx 会被编译成什么样子?
function Comp() {
  return <span>hello</span>;
}

function App() {
  return (
    <div id="test">
      <Comp />
      <ul>
        <li>1</li>
        <li>2</li>
      </ul>
    </div>
  );
}
2
3
4
5
6
7
8
9
10
11
12
13
14
15
经过 babel 编译后,生成如下代码:
function Comp() {
  return React.createElement("span", null, "hello");
}

function App() {
  return React.createElement(
    "div",
    {
      id: "test"
    },
    React.createElement(Comp, null),
    React.createElement(
      "ul",
      null,
      React.createElement("li", null, "1"),
      React.createElement("li", null, "2")
    )
  );
}
2
3
4
5
6
7
8
9
10
11
12
13
14
15
16
17
18
19
可以看到,经过 babel 编译后的代码,是将 jsx 转换成 React.createElement 的函数调用模式。我们再来看一下 React.createElement 在做什么?
const ReactElement = function(type, key, ref, self, source, owner, props) {
  const element = {
    $$typeof: REACT_ELEMENT_TYPE,
    type: type,
    key: key,
    ref: ref,
    props: props,
    _owner: owner
  };
  return element;
};

function createElement(type, config, children) {
  return ReactElement(
    type,
    key,
    ref,
    self,
    source,
    ReactCurrentOwner.current,
    props
  );
}
2
3
4
5
6
7
8
9
10
11
12
13
14
15
16
17
18
19
20
21
22
23
可以看到 React.createElement 函数返回的是一个特定格式的 js 对象。
# React.Children 原理
这里介绍一下 React.Children,这个方法封装了处理 props.children 的方法。
import { forEach, map, count, toArray, only } from "./ReactChildren";
const React = {
  Children: {
    map,
    forEach,
    count,
    toArray,
    only
  }
};
2
3
4
5
6
7
8
9
10
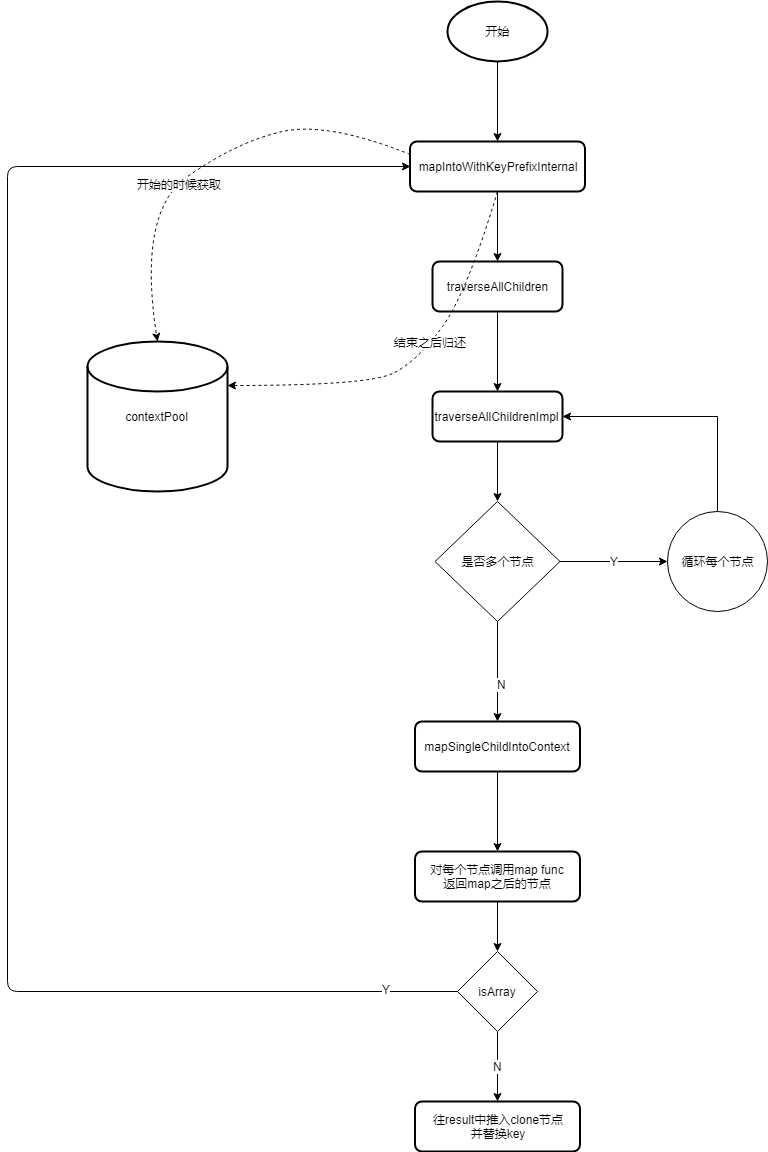
以 React.Children.map 为例,具体的流程如下图所示。

# ContextPool
看完流程图,你可能有疑惑,contextPool 是用来干嘛的?
试想一下,如果每次构建节点,都要构建指定格式的 obj,用完之后,被系统垃圾回收掉。对于内存来说,就会不断进行内存分配,内存释放的过程,通过任务管理器查看内存状态时,就会看到锯齿形状的内存图。
为了避免这种情况,react 使用一个 contextPool 来进行复用对象复用,当需要构建 obj 时,直接从 contextPool 里获取第一个 obj,重新进行赋值就可以了,当使用完成后,再将这条数据内容清空,加入到 contextPool 里,以供下次使用。
contextPool 部分代码如下:
const POOL_SIZE = 10;
const traverseContextPool = [];

// 复用完毕之后,清空操作,如果 pool 小于 10,就会加入到 contextPool 中。
function releaseTraverseContext(traverseContext) {
  // 使用完成,清空对象
  traverseContext.result = null;
  traverseContext.keyPrefix = null;
  traverseContext.func = null;
  traverseContext.context = null;
  traverseContext.count = 0;
  if (traverseContextPool.length < POOL_SIZE) {
    // 加入到 pool
    traverseContextPool.push(traverseContext);
  }
}

// 获取 contextPool 中的对象
function getPooledTraverseContext(
  mapResult,
  keyPrefix,
  mapFunction,
  mapContext
) {
  if (traverseContextPool.length) {
    // 复用对象
    const traverseContext = traverseContextPool.pop();
    traverseContext.result = mapResult;
    traverseContext.keyPrefix = keyPrefix;
    traverseContext.func = mapFunction;
    traverseContext.context = mapContext;
    traverseContext.count = 0;
    return traverseContext;
  } else {
    // 第一次,返回新对象
    return {
      result: mapResult,
      keyPrefix: keyPrefix,
      func: mapFunction,
      context: mapContext,
      count: 0
    };
  }
}
2
3
4
5
6
7
8
9
10
11
12
13
14
15
16
17
18
19
20
21
22
23
24
25
26
27
28
29
30
31
32
33
34
35
36
37
38
39
40
41
42
43
44
# 在 React.Children 中设置组件 key
顺着 React.Children.map 继续往下走,会自动设置 children 的 key 值,最后返回 map 后的数据。
设置后的一个 children 如下所示:
React.Children.map(this.props.children, children => [children]);
// children 的 key 会自动加上前缀
{
  type: 'span',
  key: '.0/.0',
  ref: null,
  props: Object,
  _owner: null,
  _store: Object
}
2
3
4
5
6
7
8
9
10
接下来我们看一下 React.Children.map 是如何设置 key 的?
// 代码已简化
function mapChildren(children, func, context) {
  const result = [];
  mapIntoWithKeyPrefixInternal(children, result, null, func, context);
  return result;
}

function mapIntoWithKeyPrefixInternal(children, array, prefix, func, context) {
  // 注意 mapSingleChildIntoContext
  traverseAllChildren(children, mapSingleChildIntoContext, traverseContext);
}

function traverseAllChildren(children, callback, traverseContext) {
  return traverseAllChildrenImpl(children, '', callback, traverseContext);
}

function traverseAllChildrenImpl(
  children,
  nameSoFar,
  callback, // mapSingleChildIntoContext
  traverseContext
) {
  switch (type) {
      case 'string':
      case 'number':
        invokeCallback = true;
        break;
      case 'object':
        switch (children.$$typeof) {
          case REACT_ELEMENT_TYPE:
          case REACT_PORTAL_TYPE:
            invokeCallback = true;
        }
    }

  if (invokeCallback) {
    callback(
      traverseContext,
      children,
      nameSoFar === '' ? '.' + getComponentKey(children, 0) : nameSoFar,
    );
    return 1;
  }
    // 设置 children 的 key
    for (let i = 0; i < children.length; i++) {
      child = children[i];
      nextName = nextNamePrefix + getComponentKey(child, i);
      subtreeCount += traverseAllChildrenImpl(
        child,
        nextName,
        callback,
        traverseContext
      );
    }
  }
  return subtreeCount;
}

function mapSingleChildIntoContext(bookKeeping, child, childKey) {
  const { result, keyPrefix, func, context } = bookKeeping;

  let mappedChild = func.call(context, child, bookKeeping.count++);
  if (Array.isArray(mappedChild)) {
    // 循环遍历 children
    mapIntoWithKeyPrefixInternal(mappedChild, result, childKey, c => c);
  } else if (mappedChild != null) {
    // 深拷贝一个child,并替换 key
    mappedChild = cloneAndReplaceKey(
      mappedChild,
      keyPrefix +
        (mappedChild.key && (!child || child.key !== mappedChild.key)
          ? escapeUserProvidedKey(mappedChild.key) + '/'
          : '') +
        childKey
    );
    // 返回 map 完成的 child
    result.push(mappedChild);
  }
}
2
3
4
5
6
7
8
9
10
11
12
13
14
15
16
17
18
19
20
21
22
23
24
25
26
27
28
29
30
31
32
33
34
35
36
37
38
39
40
41
42
43
44
45
46
47
48
49
50
51
52
53
54
55
56
57
58
59
60
61
62
63
64
65
66
67
68
69
70
71
72
73
74
75
76
77
78
79
# 总结
这一节分析了从 jsx 转换,到构建 js 对象的过程,其中还包括 React.Children 的原理,下一章继续分析 ReactDOM.render 构建 fiberRoot 的过程。